OPENING YOUR DIGITAL DOORS AS PHYSICAL DOORS SHUT WITH FACEBOOK LIVE.
It should be no surprise to know that social media plays an increasingly important role in the marketing strategy of your club. Social Media sites including Facebook help you to connect with your customers on a regular basis and increase awareness about what your club has to offer. In this blog post, we want to help you understand the 'Facebook Live' feature, why it's so popular and how it can help you during this time of uncertainty.

Facebook Live is a well used feature on Facebook which makes use of the camera on mobile devices or computers to allow users to broadcast real-time videos to audiences on Facebook. One of the main benefits for your club is that it will allow you to engage with your audiences when access to physical premises may be difficult.
How Do I Use Facebook Live?
Now that we've covered the basics of what Facebook Live is and how it can help you, you may be wondering how to use this tool. Lucky for you, we've created a 12 step process on how to start broadcasting to your members.
Step 1: Tap the Camera Icon
You should begin by opening the Facebook app on your mobile and head to your News Feed. On your feed you'll see a camera icon to the left of your search bar, tap on the icon to open your camera as seen below. You'll need to make sure that you have given Facebook permission to access your mobile device's camera and microphone in order to go live.
![]()
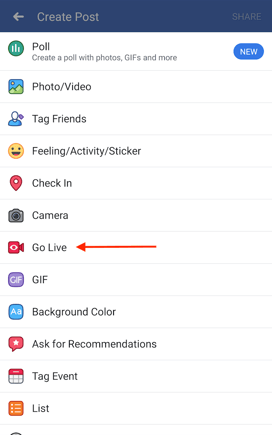
Alternatively, you can also access the 'Go Live' feature from your own Facebook profile. As shown below, click on the status bar by tapping the text that reads 'What's on your mind?' and then select the "Go Live" option from the menu.
Step 2: Allow Access to Camera and Microphone
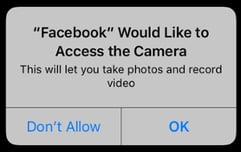
The first time you use the 'Go Live' feature, you may be presented with messages of Facebook asking you to allow access to your camera and microphone which you can see in the image below. In order to use the 'Go Live' feature, you should click ok and following the first use, you should stop receiving these prompts.
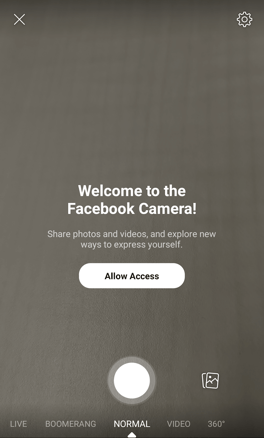
The next stage will ask you to permit use of your phone's camera content, as shown below. This will trigger your ability to switch from using your rear-facing camera to your front-facing camera -- options that will come into play in step 7 of this guide.
Step 3: Get Ready to Go Live
Once you have permitted Facebook to access your mobile device's camera and microphone, you'll be ready to begin live streaming your classes. However, when you open the Facebook camera feature, it automatically defaults to non-live photo shooting when you open it. To go into the live move, simply select the 'Live' function as seen in the image below - don't worry, you won't go live right away.
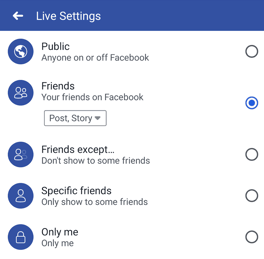
Step 4: Configure Privacy and Posting Settings
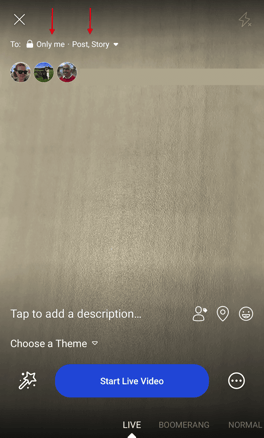
Now that you've opted to go live, you'll need to make sure that you allow your members access to view your video. As pictured below, the default setting off 'Only me' means that your account will only show the video to yourself - so none of your followers will be able to view anything to stream. The first time you opt for a live stream, you may wish to test it to ensure it runs smoothly and to allow you to get a feel for the streaming methods before going live to your club. A practice run will help smoothen the process, allow you to be more efficient and for club members to be impressed by your technical skills.
When logged into Facebook, you will need to make sure that you are on your groups page to live stream from the club. Once you are ready to stream to your members, you can go ahead and adjust the settings. When posting for your club, there will be a public option which is a function to make sure it can reach everyone who's currently on Facebook. For your club, you'll most likely want to select the 'friends' setting to live stream to your members.
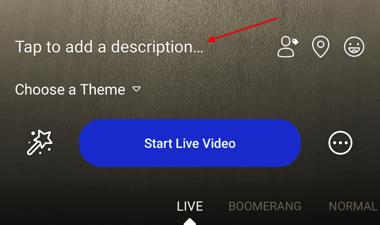
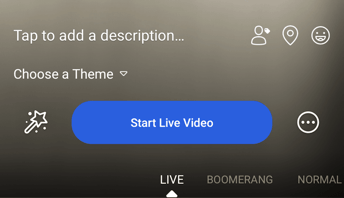
Step 5: Write a Compelling Description
Now you've got the technical side set up, you will need to give your broadcast a description. At ClassForKids, we always emphasise the importance of being clear about what your club is all about and this shouldn't be any different. This is an important section and you may wish to include what type of content and class information will be included in the video so members know they are tuning in to the right video. This will then show up on member's News Feeds similar to a status update.
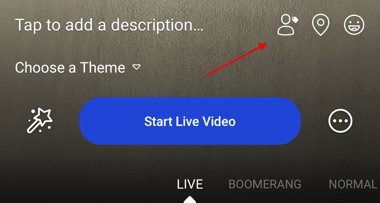
Step 6: Tag Friends, Set Location or Add an Activity
You can use the icons at the bottom of your screen as pictured below to tag people who are in the Facebook Live video (this may include coaches or other staff members), add a location from where you're shooting, or share what you're doing in the broadcast. These touches will keep your club members engaged and add a personal connection in a digital space.
Step 7: Camera Orientation
Now that you are set to go with live streaming, it is important to make sure that you have your camera facing in the right direction you want it to face before going live. If you are streaming a live class in which you are exhibiting a routine or specific move, you'll likely want the rear-facing camera or if you are talking to parents or children directly, you'll want to go live with your front-facing camera. You can change the direction of your camera by simply clicking the rotating arrow in the camera icon as seen below.
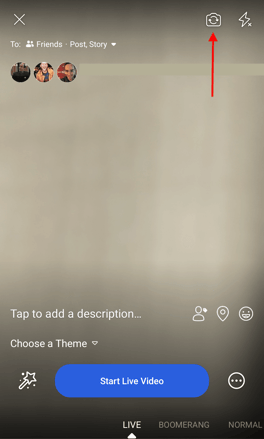
Note: The video will be a square, so it doesn't matter whether you hold your mobile device vertically or horizontally.
Step 8: Click 'Start Live Video' to Start Broadcasting
Get ready for your class to enter into the digital world - once you click 'start live video', Facebook will give you a countdown - then you'll be live. Your live stream video can be up to 90 minutes long, so make sure you factor this in when planning your online lesson.
Step 9: Interact with Viewers
One way of keeping your views engaged is by encouraging them to interact with your live video by speaking with them directly. You can also see any members commenting during the live video as seen in the image below. You may have time to respond to comments verbally throughout your live stream or you can focus on the content of your class structure and respond to queries after the live video has ended.

Step 10: Remember to End Your Live Stream
Make sure you click 'Finish' in order to end your live stream. Once you do this, the video will stay on your Timeline or Page like any other video post.